Today we'll be putting in place a very basic framework that will evolve into the base of our engine. While XNA is quite powerful, you still need to write code for most stuff, unlike Unity where you drag and drop objects into the scene and drag scripts onto objects.
One fair piece of warning. I am new to XNA and things I put together are most likely slapped together, at least in the beginning. In the future I might have to revisit these samples with the benefit of hindsight.
Another one is that I am not sure yet how the content loading works. This sample uses a sprite font external file descriptor. I put the file in the proper place and it failed to load. So I removed the file from the disk, right clicked on the project, added a folder, copied the file in the new folder, right clicked again, chose "add existing item" and then it worked. So I'm guessing the resources you can load must be added to the content project first. I'll update once I figure out exactly what the conditions are and if you can load a resource from anywhere on the disk on the fly.
Now I am way behind since I am porting to C#/XNA and I need to get things running in record time. Ideal situation would be to have first person camera, model loading and dynamic mesh placement on an empty plane done in the first week and for it to be flawlessly executed. This is not a reachable goal, but I'll strive for as much as I can push out considering also the effort required to create these posts. So I need to cut down on unnecessary effort whenever possible.
And for this I am going to use every resource that is available to me. As said, XNA seems pretty popular and there are a lot of ready to use and free components out there. Some of these components will be temporary, just to get things started, while others will more likely become permanent code base references.
The first resource I would like to show you is www.dhpoware.com. This site has a ton of very useful snipets and understanding these can get you started on your path to become the best Pokémon trainer in the world. A few lines of code in the following tutorials will be very similar to samples from there, since I copied and pasted them. In the case of these few lines things have been adapted and are not a straightforward copy, but in the future I hope I can include full classes from there unmodified with all the comments, functionality and copyright notices.
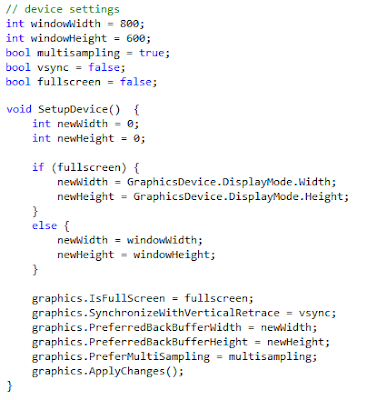
So let's get started! For the second tutorial will add the required functionality, but we won't properly structure the code, so things will be all over the place, to better reflect the natural process of figuring things out. But don't let this excuse allow real bugs to slip though. I'm sure I made a mistake or two unintentionally, if now today, someday in the future there will be ones and if you find them, call me out on them and I'll correct them. I'll use edited screenshots to better organize this post, starting with device setting and setup. Our class will get a few members describing the device and a general function that will update the device setting whenever called:
We have the window height and width which are very straightforward and a parameter to select windowed mode or full-screen. In full-screen mode the actual resolution will be set to the screen maximum for now, leaving further optiones to be added later. We also have one parameter to control vertical synchronization. In practice when developing the engine I want v-sync off, to see how well it performs. When actually playing the game I probably want it on, to both prevent the GPU from overheating from unnecessary work load and for the reduced screen tearing-like effect that sometimes accompanies rendering with v-sync off. The last parameter controls multisampling, a form of antialiasing. This is very bare-bones and not sure yet if it does anything. In the future, especially once we have the GUI back, we'll need finer control, selecting the number of samples and if possible, select between MSAA and CSAA.
Next, we have keyboard and mouse support, more precisely keyboard support and placeholder variables for mouse support:
Normally you'd want to just check the current keyboard state for some keys being pressed, like moving forward. But you also need to detect individual keyboard presses. This is is where the two keyboard state variable come in: one is the last keyboard state and one the current one. Every time you process the keyboard you make the old state become the current one and get a new state. Comparing the two you can detect keyboard events. If in the current state you have a key pressed and the previous state it was not pressed, it means that an event took place. This also protects you from reacting to a key being held down, since it will appear both in the current and previous key state. The helper function KeyJustPressed does this. Using it we check for 'F' and toggle fullscreen mode and for 'V' and toggle v-sync. Such options are purely for tutorial and playing around with the engine. As it becomes more stable you won't be toggling random options like this and use such useful keybindings for more specific stuff, but even here the advantage is apparent: you can change your device's properties on the fly! The old engine did not know this. I could have implemented it, but it would not have been as easy as here. We also added Escape to close the application and removed the gamepad support.
The next piece of the puzzle is text rendering:
We construct a string and using the sprite batch object from tutorial one, simply render it at a given position with a given font. The font is loaded from and XML file describing font type, size and even which characters to include. This is yet again a dynamic bitmap font created on the fly when the application loads, probably having all the advantages I talked about in the DXUT description of such fonts.
As support for this method we have a text position we can initialize anywhere and a sprite font we load in the LoadContent method, after the sprite batch creation, though I suspect this order is not necessary.
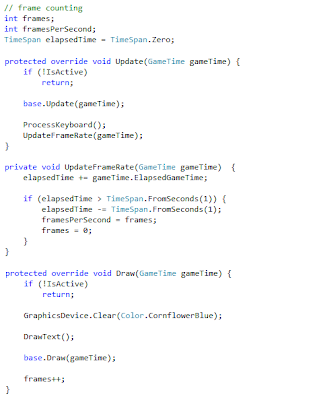
The final piece of the puzzle is the frame rate calculation. In the Update method we determine if enough time has passed to update the framerate and in the Draw method we increment the frame counter:
Again, very simple stuff. Both the Update and Draw method check to see if the window is active. We generally don't want to have the game run when it is not focused. In Update you enumerate all process methods. In the real game you'll have to process keyboard & mouse, do collisions, do physics, do animations, update events and all other game logic necessary for one frame. Then you'll update the framerate counter. In the Draw method you'll clear some buffers, render you scene, render the GUI and text overlays and then increment the frame count.
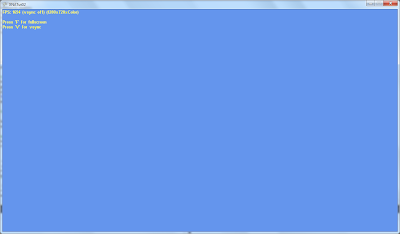
Let's see how our application looks:
Pretty basic stuff, but not bad for only a few lines of code. With DXUT this was a lot longer and I needed abstraction layers over abstraction layers to get a comfortable environment.
This is also a very informal benchmark, telling us the the font rendering is not really a bottleneck. I'm sure that without text we get slightly better FPS, but almost 1700 at 720p means that text rendering is not a bottleneck. Also, FRAPS works fine, which is pretty much a must these days. Hope it will continue to work once we do actual rendering, a.k.a. "the next time". (I'm aware that that makes no sense grammatically)
Hopefully functional source code: XNATut02.rar.
Hopefully functional source code: XNATut02.rar.


No comments:
Post a Comment